
Have you ever come across someone performing an exercise that looks so simple that you can’t figure out how or why they’d choose to do that? That’s most people’s reaction when they first see the Pallof press! Yet, this exercise is deceptively… challenging!
What’s a Pallof press, you ask? Simply put, it’s one of the Girls Gone Strong absolute favorite core exercises! It’s an anti-rotation exercise, which means that you’ll literally be using your core to resist twisting to one side.
What Are the Benefits of the Pallof Press?
In general, the Pallof press can be used to:
- Increase core strength, primarily in the anterior core and obliques
- Even out asymmetries and imbalances between the left and right sides
- Reduce the risk of injuries resulting from a weak anterior core (and the subsequent pelvic and spinal stability issues)
What makes the Pallof press special among core exercises is that it truly has variations that are suitable for every level of technical ability and training experience, so beginner and advanced exercisers alike can use it in their programming.
 What Equipment Do You Need?
You will need either a cable machine or a resistance band anchored to a point. In the standard position, the cable or band will be positioned at chest height (think sternum), but it can also be placed higher or lower in variations of the exercise.
What’s the Proper Technique?
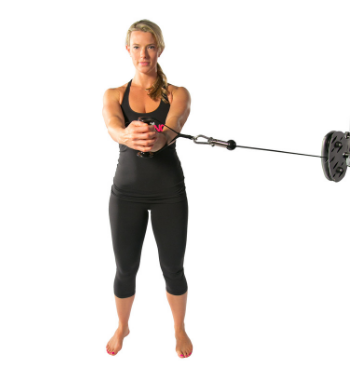
While the following describes the Pallof press done from a standing square stance, with the band or cable at chest height, this exercise can also be performed in a split stance, as well as in a tall kneeling and half-kneeling position.
Set Yourself Up
- Set the cable attachment or resistance band at chest height.
- Stand with your side to the anchor point, in an athletic square stance. When you extend your arms, the cable and your arms should form a 90-degree angle, so position your body accordingly.
- You should have a slight bend in your knees, and your feet should be hip- to shoulder-width apart.
- Grab the cable attachment or band with your outer hand (farthest away from cable machine or anchor point), and lightly rest the fingertips of your inside hand on top of the other hand. This grip takes the inside arm out of the equation and really forces the core muscles to work much harder.
- Before you go take a deep breath into your belly (360 degrees of air around the spine).
The Movement
- Forcefully exhale as you extend your arms, actively soften your rib cage towards your hips (close the space in your midsection), and lightly engage your glutes, creating tension through your whole body.
- Hold your arms in the extended position for 1–2 seconds before you bring them back to the starting position.
- As you bring your arms back in towards your body, stop when your elbows touch your sides. Don’t allow your hands or forearms to touch your anterior core. Relax your arms so they do not dominate the exercise.
- Keep your shoulders pinned, and your shoulder blades drawn together and down toward the opposite hip. Do not allow your shoulders to round or shrug.
- Maintain a tripod foot (weight on the mid to back of your foot, and keep your big and baby toe down) for the duration of the exercise. This will improve your overall stability and ability to perform this exercise.
- Maintain proper alignment for the duration of the exercise. There should be no rotation occurring in your shoulders, torso or pelvis, and your body should not tilt laterally. Your body should remain relatively vertical (can have a slight forward lean in your torso), and your spine should remain in a neutral position.
- Do not allow your knee to collapse in or fall out. Reset before each rep.
- Complete all reps on one side before moving to the other side.
When Should One Perform Pallof Presses?
Pallof presses can either be used at the beginning of a workout, as a stability-based warm-up exercise or at the end after the more complex compound exercises have been performed. It can also be used on its own as an anti-rotation exercise for your trunk.
Beginners should start by mastering the standing square stance Pallof press described above before progressing to more advanced variations such as performing the exercise in a split stance, in the kneeling and half-kneeling position, as well as doing isometric holds or circles instead of continuous reps.
Aim for 3 sets of 6–10 reps. The exercise can be made more challenging by adding more weight to the cable stack, using a thicker resistance band or moving further away from the anchor point.
FREE course – 5 SECRETS TO GET MORE RESULTS IN LESS TIME
Learn the most effective strategies for getting the exact results you want — without spending your life in the gym.
Our Girls Gone Strong Formula has helped thousands of women all over the globe get the results they’re looking for.
Now we’re sharing our secrets with you. Click the button below to get your first free lesson
stand the Blueprint and be willing to trust the process.
