
Believe it or not, ear wax serves a great purpose. It protects the skin in the ear canal, acts as a deterrent for dirt and bacteria, and assists in cleaning and lubricating the ear. Yet too much of a good thing can be detrimental, especially when it prevents your hearing aids from working properly.
earwax buildup. (Photo courtesy Oticon)
In fact, wax buildup is one of the leading causes for hearing aid repair, along with moisture and battery malfunction. When this occurs, the sound coming through your hearing aids may be weak and distorted – or nonexistent. And while your hearing healthcare professional will be happy to remove the wax buildup for you, there are a few techniques you can use at home to keep your hearing aids clean between visits. You may also want to brush up on the various parts of a hearing aid so you understand what you’re working with as you clean.
Purchase a hearing aid cleaning kit
If your hearing center didn’t provide you with a cleaning kit when you purchased your instruments, consider investing in one yourself. Costs range anywhere from $ 7 to $ 45 from local big box stores or online outlets. Kits, such as this sample one, contain a variety of tools, usually a wax removal brush and pick, battery magnet, tube and vent cleaner, and battery door opener.
More: Learn how to clean and maintain your hearing aids at home
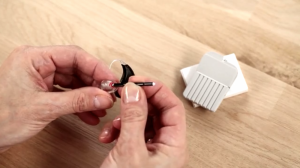
Make a visual inspection
Most likely, if you take a close look you’ll be able to see where wax is accumulating. Begin by wiping your hearing aids with a clean, dry cloth. If the wax is still visible, use the tools in your cleaning kit to remove it safely.
Filters and hearing aid wax guards
Most hearing aids today come with built-in wax protecting mechanisms such as filters and wax guards. These parts are designed to be removed easily by the user; replacement parts are typically provided at your first fitting. The life of these filters and guards vary, as ear wax production fluctuates from person to person. If your hearing aid has a filter or wax guard, inspect them daily for signs of debris.
Sound bores and hearing aid tips
Sound exits a hearing aid through the sound bore or tip. If this part becomes clogged with ear wax, use a small wax loop or brush to gently scoop the debris from the opening.
Tubing
If you wear a behind-the-ear (BTE) hearing aid, be sure your inspection includes the tubing, which connects the hearing aid to the earmold or dome. Use a small, flexible wire or air blower to help dislodge the blockage. More: Hearing aid types and styles.
Invest in a hearing aid dryer
Ear wax, also known as cerumen, can also contribute to moisture-related problems with your hearing aids. After you inspect and clean your hearing aids, storing them in a hearing aid dryer overnight is a good way to safely keep your instruments dry and functional.
Hearing aid dryers range in price from $ 5 to $ 90 and are available at big box stores or online outlets. You might also check with your hearing center for a recommendation of which dryer is best to use for your particular brand of hearing aid.
Your hearing aids are an investment – in better hearing as well as your quality of life. Studies show that individuals with hearing loss who wear hearing aids have less incidents of depression, anxiety and social depression than those who do not. When you take a few minutes each day to clean and dry them, you’ll be able to more fully enjoy the benefits they provide.
Editor’s note: To help us support our website and continue bringing our readers the latest information about hearing loss and hearing aids, this article contains affiliate links to products on Amazon.com.